Pay in installments of $7.38 with
 ,
,
 and
and

Shipping Estimate
USA
- USA
- CAN
- USA
- CAN
Ships within 48 hours · Estimated delivery Jul 20 - Jul 25
 Promo Codes Available:
For Your Every Summer RSVP, with Code: SUMMER15
Description
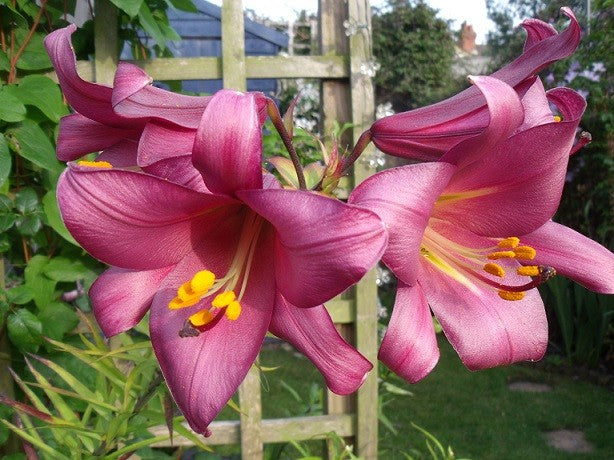
lily trumpet flower Pink Perfection Trumpet Lily – The Lily Pad Bulb FarmThis tall stately trumpet lily is exceedingly fragrant. Colors range through the light to deep pink to purple black spectrum, intensifying with cooler evening temperatures. Flowers are funnel shaped and very large (10 12 inches). Very hardy and disease resistant. 16 18 cm bulb size. Botanical name: Lilium x aurelianense 'Pink Perfection' Form: Perennial Hardiness Zone: 3 9 Flower Color: Shades of pink and purple Foliage Type: Linear, green leaves
This tall stately trumpet lily is exceedingly fragrant. Colors range through the light to deep pink to purple-black spectrum, intensifying with cooler evening temperatures. Flowers are funnel shaped and very large (10-12 inches). Very hardy and disease resistant. 16-18 cm bulb size.
Botanical name: Lilium x aurelianense 'Pink Perfection'
Form: Perennial
Hardiness Zone: 3-9
Flower Color: Shades of pink and purple
Foliage Type: Linear, green leaves arranged in whorls or spirals up the stems
Bloom time: July
Height: 4-6 ft
Spread: 12-24 inches
Light requirements: Full to half sun
Plant depth: 6 inches of soil over top of bulb
See "Growing Tips" for more detailed instructions
Form: Perennial
Hardiness Zone: 3-9
Flower Color: Shades of pink and purple
Foliage Type: Linear, green leaves arranged in whorls or spirals up the stems
Bloom time: July
Height: 4-6 ft
Spread: 12-24 inches
Light requirements: Full to half sun
Plant depth: 6 inches of soil over top of bulb
See "Growing Tips" for more detailed instructions
Tips and Growing Instructions
Visit our How-To Cultivation Library for more growing tips.
Trumpet lilies are known for their huge, trumpet-shaped blossoms and their impressive height. Planting trumpet lily bulbs is very similar to planting most lily varieties. You can plant the bulbs in either the fall or the spring in neutral soil.
Lily “bulbs” are actually tubers composed of fleshy scales and lack a protective covering. Unlike true bulb flowers, they never go completely dormant and should be handled carefully since they loose moisture very quickly. Essentially, you can plant your new lilies anytime after the ground freezes in Spring.
Lilies are incredibly easy to grow and few garden pests trouble them. The most natural location for lilies is on sloping ground with excellent drainage. Lilies prefer to have their blooms in the sun and their roots in the shade. Try planting them among annuals or perennials that will keep their roots cool.
The general rule of thumb for planting spring bulbs is to plant two to three times as deep as the bulb is tall. This means that some of our larger Bulb-Zilla lily bulbs will need to be planted 6-8 inches deeps. Plant with the roots downward and the scales upward. After planting, water well two or three times. Lilies are most effective when planted in groups of three or more. Space them about a foot apart – they will spread and fill this space in no time!
Always allow the leaves on the stalk to turn yellow and fall off as part of the lily’s natural growth process. This ensures that the bulbous underground part of the plant has gotten enough nourishment and will mean greater growth next year. Each year watch their beauty increase as they multiply!
Visit our How-To Cultivation Library for more growing tips.
Trumpet lilies are known for their huge, trumpet-shaped blossoms and their impressive height. Planting trumpet lily bulbs is very similar to planting most lily varieties. You can plant the bulbs in either the fall or the spring in neutral soil.
Lily “bulbs” are actually tubers composed of fleshy scales and lack a protective covering. Unlike true bulb flowers, they never go completely dormant and should be handled carefully since they loose moisture very quickly. Essentially, you can plant your new lilies anytime after the ground freezes in Spring.
Lilies are incredibly easy to grow and few garden pests trouble them. The most natural location for lilies is on sloping ground with excellent drainage. Lilies prefer to have their blooms in the sun and their roots in the shade. Try planting them among annuals or perennials that will keep their roots cool.
The general rule of thumb for planting spring bulbs is to plant two to three times as deep as the bulb is tall. This means that some of our larger Bulb-Zilla lily bulbs will need to be planted 6-8 inches deeps. Plant with the roots downward and the scales upward. After planting, water well two or three times. Lilies are most effective when planted in groups of three or more. Space them about a foot apart – they will spread and fill this space in no time!
Always allow the leaves on the stalk to turn yellow and fall off as part of the lily’s natural growth process. This ensures that the bulbous underground part of the plant has gotten enough nourishment and will mean greater growth next year. Each year watch their beauty increase as they multiply!
Shipping
Sorry, we do not ship outside the U.S. or to Hawaii due to agricultural restrictions.
We guarantee safe arrival of healthy bulbs, that varieties will be true-to-name, and will grow if planted as instructed, subject to the limitations described in our Shipping and Returns Policy.
We begin shipping our bulbs in mid-February through Spring. Despite what you may have heard, Spring planting of bulbs is not a bad thing, and in fact, there are many advantages to planting in Spring. Visit our Spring Planting page to learn more. Upon arriving, your bulbs and most of your perennials may show signs of growth such as green leaves and sprouts - this is okay and transportation during this time should not harm the plants.
All bulbs and perennials should be planted in your garden as soon as possible to ensure the best success. If you must delay planting, open the bags to permit air circulation and place them out of direct sunlight in a cool, well-ventilated room. Do not place the bulbs where they can freeze. If you have the space, storing the bulbs in the refrigerator is another excellent way to “hold them” prior to planting. If you choose this method of storing your bulbs, be sure not to store fruit with them, as this is detrimental to bulbs.
Plant outdoors when the ground is no longer frozen and the conditions have improved for your zone.
If you have any questions or concerns our customer service team would be glad to help you at any time. Please use our contact form or email us at [email protected].
Shipping Notes
- Free Standard Shipping on $100+ Orders to the USA.
- Except Preorder products are shipped in 48 hours.
- Delivery to the USA:
- Standard Shipping : 3-10 business days
- If time is of the essence, please consider selecting expedited delivery for faster service.
Exchange/Return Notes
- We offer a 30-day return/exchange service after receiving.
- Final sale items are not eligible for returns or exchanges.
- To process your return/exchange, please contact us at [email protected]
- Please click here for more details>>> Return & Exchange Policy
4.7 ★★★★★
Based on 8 reviews
Sort
Product Reviews
★★★★★ 5
Best Wine Opener We’ve Tried
Color: Black
My husband and I like to think of ourselves as wine connoisseurs, and over the years we’ve been through dozens of wine openers. So far, this one is our favorite. It’s pure magic—smooth, easy, and reliable every time. The charging base keeps everything organized. We’ve been using it for several months now without a single issue. It feels well-made and has definitely earned a permanent spot on our counter. It works so seamlessly that now we both want to open the wine.
WAS THIS REVIEW HELPFUL?YesReportShare
Reviewed in the United States on August 25, 2025
★★★★★ 5
The PERFECT CORKSCREW
Color: Silver
Sturdy. Easy to use
WAS THIS REVIEW HELPFUL?YesReportShare
Reviewed in the United States on June 7, 2026
★★★★★ 5
I like it cause it works
Color: Silver
Amazing, opens wine bottles like it's 1999 and works no matter what. Get one, now.
WAS THIS REVIEW HELPFUL?YesReportShare
Reviewed in the United States on May 29, 2026
★★★★★ 5
Excellent build quality and thick chrome, strong threaded screw
Color: Silver
I purchased this as a gift for a friend that had problems with wine corks being broken and left inside the bottle. The intention was to have this longer tapered screw extend all the way beyond the bottom of the cork to pull out the entire cork without leaving pieces inside the bottle.
One detail that is missing from the instructions is the secret to how a wine cork remover must be used to insure success. The tapered screw must be twisted many turns, which will raise the two lever arms directly upwards away from the bottle. It is critical that you keep turning the screw and remove the metal or paper seal that is on the outside of the bottle before you stop turning. By looking at the bottom of the cork inside the bottle, you can watch the end of the tapered screw appear as it is turned deep inside the cork, beyond the bottom of the cork.
Once you have visual verification that the screw is all the way in, notice the appearance of the TOP of the screw outside the cork. You will see that it appears to have been turned very far, potentially damaged the outer surface of the cork. That is a GOOD sign that you used enough rotations of the screw to correctly engage the entire cork. Never skip these steps before you proceed to remove the cork.
When the screw is in the correct position, the two levers are all the way up. It may take some force to push them down, so put the wine bottle in a SINK, not a countertop. This lowers the bottle for easier access and gives you a safe place to put the cork remover after you open the bottle. Using a controlled force with both hands, move both levers down carefully to make sure that you do not deflect the tapered screw in a way that is misaligned with the neck of the bottle.
As the cork is removed, the last part may be fragile from contact with the wine. In addition, the entire cork remover becomes less stable, and free to pivot if you are not careful. This last motion can still damage a cork and create fragments, so just be careful and precise to gently pivot the levers all the way down and then if necessary use a twisting motion to ease the last part of the cork out of the bottle.
This method has never failed to remove hundreds of corks from bottles made all over the world without wrecking the cork. Try it and you will never have a broken cork problem again.
WAS THIS REVIEW HELPFUL?YesReportShare
Reviewed in the United States on September 7, 2022
★★★★★ 4
Good Quality
Color: Silver
Easy to use. Seems to be better quality than others I have had.
WAS THIS REVIEW HELPFUL?YesReportShare
Reviewed in the United States on February 13, 2026