Shipping Estimate
USA
- USA
- CAN
- USA
- CAN
Ships within 48 hours · Estimated delivery Jul 10 - Jul 15
 Promo Codes Available:
For Your Every Summer RSVP, with Code: SUMMER15
Description
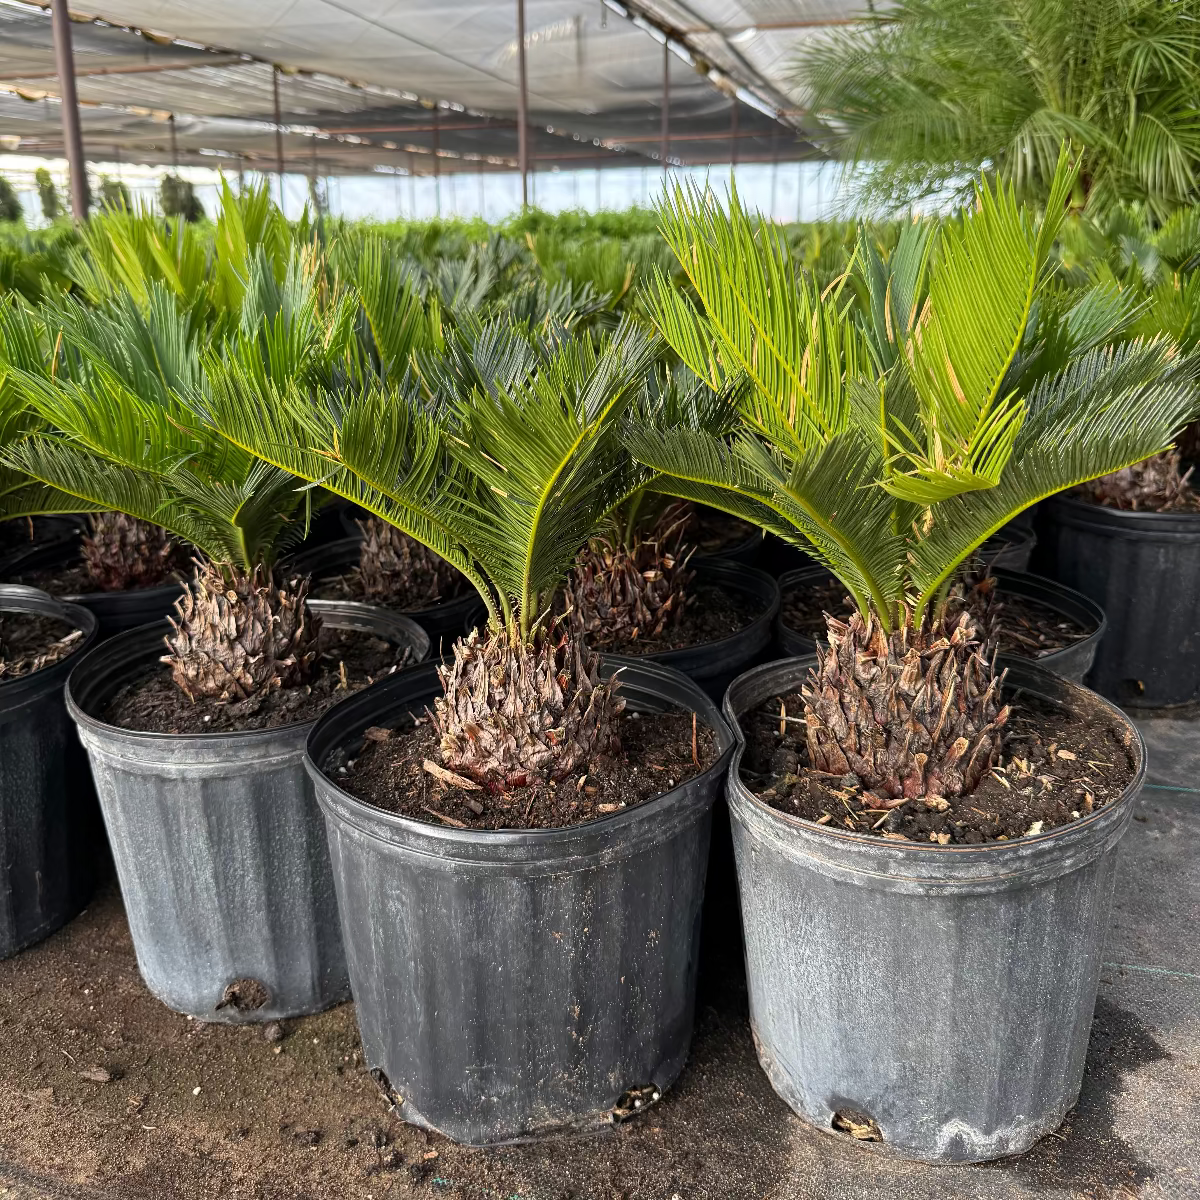
planting sago palms in pots Buy Sago Palm Phoenix, AZ | Cycas revolutaA Prehistoric Showpiece for Phoenix Gardens Sago Palm The Sago Palm (Cycas revoluta) is one of the most striking and timeless accent plants for Phoenix landscapes. Despite its name, the Sago isnt actually a palm its a cycad, an ancient plant group that predates the dinosaurs. With stiff, glossy dark green fronds radiating in a perfect symmetrical rosette from a thick, rough textured trunk, the Sago Palm adds bold architectural drama to any setting.
A Prehistoric Showpiece for Phoenix Gardens — Sago Palm
The Sago Palm (Cycas revoluta) is one of the most striking and timeless accent plants for Phoenix landscapes. Despite its name, the Sago isn’t actually a palm — it’s a cycad, an ancient plant group that predates the dinosaurs. With stiff, glossy dark green fronds radiating in a perfect symmetrical rosette from a thick, rough-textured trunk, the Sago Palm adds bold architectural drama to any setting. Slow-growing and incredibly long-lived, Sagos thrive in the Phoenix heat with minimal water and care. Whether you’re designing a modern Scottsdale courtyard, accenting a Chandler entryway, or adding year-round texture to a Gilbert patio — the Sago Palm is a timeless, low-maintenance choice.
Sago Palm Plant Details
| Attribute | Detail |
|---|---|
| Scientific Name | Cycas revoluta |
| Common Names | Sago Palm, King Sago, Japanese Sago Palm |
| Mature Height | 6–10 feet (very slow to reach full height) |
| Mature Width | 6–8 feet (frond spread) |
| Growth Rate | Very slow — 1–2 new frond flushes per year |
| Sun | Full sun to partial shade. Handles reflected heat but appreciates afternoon shade in hottest months. |
| Water | Low once established. Very drought-tolerant. |
| USDA Zones | 8b–11 (Phoenix is Zone 9b–10a) |
| Soil | Well-draining required. Adapts to Arizona caliche soils if drainage is adequate. |
| Foliage | Evergreen — stiff, glossy dark green fronds year-round |
| Type | Cycad (not a true palm) |
Sago Palm Uses in Phoenix Landscapes
Modern Desert Entryways & Courtyards
Sago Palms are a designer favorite for framing front doors, flanking garage entries, and anchoring courtyard plantings in Scottsdale, Paradise Valley, and Arcadia. Their perfect symmetry and sculptural form pair beautifully with clean-lined architecture and gravel mulch. Plant a matched pair for formal balance, or use a single large specimen as a dramatic focal point.
Container & Patio Plantings
Because of their compact size and slow growth, Sago Palms are ideal for large containers on Chandler and Tempe patios, pool decks, and balconies. A 15-gallon Sago in a decorative pot adds instant tropical-modern texture to outdoor living spaces. They also work well in narrow side yards and tight planting beds where larger palms won’t fit.
Rock Garden & Desert Modern Accents
Sagos pair perfectly with desert rock mulch, agave, and other succulents for a textured, layered desert garden in Mesa, Gilbert, and Peoria. Their dark green fronds create striking contrast against lighter gravel and boulders. Group 3–5 at varying sizes for a naturalistic cycad garden effect.
Best Time to Plant Sago Palm in Phoenix
Fall (October–November) is the ideal planting window. Warm soil promotes root establishment while cooler air reduces stress. Spring (February–April) is the second-best window. Sago Palms can handle summer planting if kept consistently watered during the first few weeks, but a fall start gives the best results for long-term establishment.
How to Plant Sago Palm
- Dig wide, not deep — excavate 2–3x the root ball width at the same depth. Sagos have shallow root systems and must not be planted too deep.
- Check for caliche — good drainage is critical. Break through any hardpan layer. If drainage is poor, consider a raised bed or mound.
- Backfill with native soil — a light 20% sand or perlite amendment improves drainage in heavy soils.
- Spacing — plant 4–6 feet apart for grouped plantings; 6–8 feet from structures to allow full frond spread.
- Water basin — build a 3–4 inch soil ring to direct water to roots during establishment.
- Mulch — 2–3 inches of gravel mulch around the base. Avoid piling organic mulch against the trunk.
Watering Sago Palm in Phoenix
First Year Watering Schedule
- Weeks 1–2: Every 2–3 days, deep and slow
- Months 1–2: Every 4–5 days
- Months 3–6: Every 7–10 days
- After Year 1: Every 10–14 days in summer; monthly in winter
Drip Irrigation
Place 1–2 emitters (1–2 GPH) 12–18 inches from the trunk. Sago Palms are very drought-tolerant once established and are easily overwatered. Let the soil dry between waterings — soggy soil causes root rot, which is the #1 killer of Sagos in Arizona.
How fast does Sago Palm grow in Phoenix?
Sago Palms are very slow growers. They produce 1–2 flushes of new fronds per year and may add only an inch or two of trunk height annually. A 5-gallon Sago will take many years to reach its mature size of 6–10 feet. For instant impact, start with a larger 15 or 25-gallon specimen.
Is Sago Palm drought tolerant?
Very much so. Established Sago Palms are among the most drought-tolerant landscape plants available. They store moisture in their thick trunks and need only deep, infrequent watering once their root systems are established.
Are Sago Palms toxic?
Yes — all parts of the Sago Palm are toxic to pets (especially dogs) and humans if ingested. The seeds are the most toxic part. If you have curious pets, consider placing Sagos in areas pets can’t access, or choose a pet-safe alternative.
Is Sago Palm actually a palm?
No. Despite its common name, the Sago Palm is a cycad — a primitive plant group that has existed for over 200 million years. Cycads are more closely related to conifers than to true palms. Their prehistoric lineage gives them a unique, sculptural appearance that true palms don’t have.
Do Sago Palms survive Phoenix freeze events?
Sago Palms are cold-hardy to about 15°F, making them very resilient during Phoenix’s rare winter freezes. They may show some frond burn after a hard frost, but the plant typically recovers fully with new growth in spring.
You May Also Like
- Pygmy Date Palm — a compact feather palm for patios and small spaces, with soft arching fronds.
- Mediterranean Fan Palm — a multi-trunk fan palm with a sculptural form, great for desert modern designs.
- Pineapple Palm — a bold statement palm with a massive crown and thick textured trunk.
- Desert Spoon — a native Arizona accent plant with blue-green rosettes and a similar architectural feel.
How Many Sago Palms Do I Need?
Sago Palm is a slow, sculptural cycad with a 6 to 8 foot frond spread, so it is set as a specimen or grouped, never run as a hedge. Use these layouts:
- Single focal point: one large Sago in a courtyard, entry bed, or decorative pot, set 6 to 8 feet from walls so the rosette spreads symmetrically.
- Matched pair: flank a front door or garage with two for formal balance, each 6 to 8 feet off the structure.
- Cycad grouping: cluster 3 to 5 at varying sizes 4 to 6 feet on center for a naturalistic rock-garden effect.
The fronds are stiff and lightly spine-tipped, so keep the rosette 2 to 3 feet back from walkways and seating where people brush past.
Sago Palm Season-by-Season in Phoenix
- Spring (Feb–Apr): the main event, a single symmetrical flush of bright new fronds rises from the crown; a strong second planting window.
- Summer (May–Sep): tough in heat and reflected heat, though afternoon shade keeps fronds their deepest green in the worst of it. Let soil dry between deep soaks, since wet summer roots invite rot. A second light flush can follow monsoon rains.
- Fall (Oct–Nov): the prime low-desert planting season; the glossy crown holds as growth slows.
- Winter (Dec–Jan): evergreen and cold-hardy to about 15°F, shrugging off typical Valley freezes. A hard frost may brown some fronds, but the plant pushes fresh growth in spring.
At a Glance
✔ Heat-Loving (Reflected-Heat Tolerant) ✔ Drought-Tolerant ✔ Evergreen ✔ Pool-Friendly (Low-Litter) ✔ Low-Maintenance ✔ Deer & Rabbit-Resistant ✔ Cold-Hardy to 15°F
Plant It With
- Desert Spoon: a native blue-green rosette with a matching architectural feel for a low-water accent.
- Pygmy Date Palm: a compact feather palm that softens the Sago's stiff rosette in a grouping.
- Mediterranean Fan Palm: a sculptural multi-trunk palm for desert-modern layering.
- Pineapple Palm: a bold full-size crown to tower over a Sago understory.
Is Sago Palm Right for Your Yard?
Sago Palm thrives in Phoenix sun with a little afternoon shade, asks for very little water, and adds timeless architectural form to courtyards, entries, pots, and rock gardens with almost no upkeep. It is not a fit if you have curious pets or small children, or want fast results: every part of the plant is toxic if chewed or eaten, and it is one of the slowest-growing plants you can buy.
Shipping Notes
- Free Standard Shipping on $100+ Orders to the USA.
- Except Preorder products are shipped in 48 hours.
- Delivery to the USA:
- Standard Shipping : 3-10 business days
- If time is of the essence, please consider selecting expedited delivery for faster service.
Exchange/Return Notes
- We offer a 30-day return/exchange service after receiving.
- Final sale items are not eligible for returns or exchanges.
- To process your return/exchange, please contact us at [email protected]
- Please click here for more details>>> Return & Exchange Policy