SKU: 20161893471
hanging naked plant

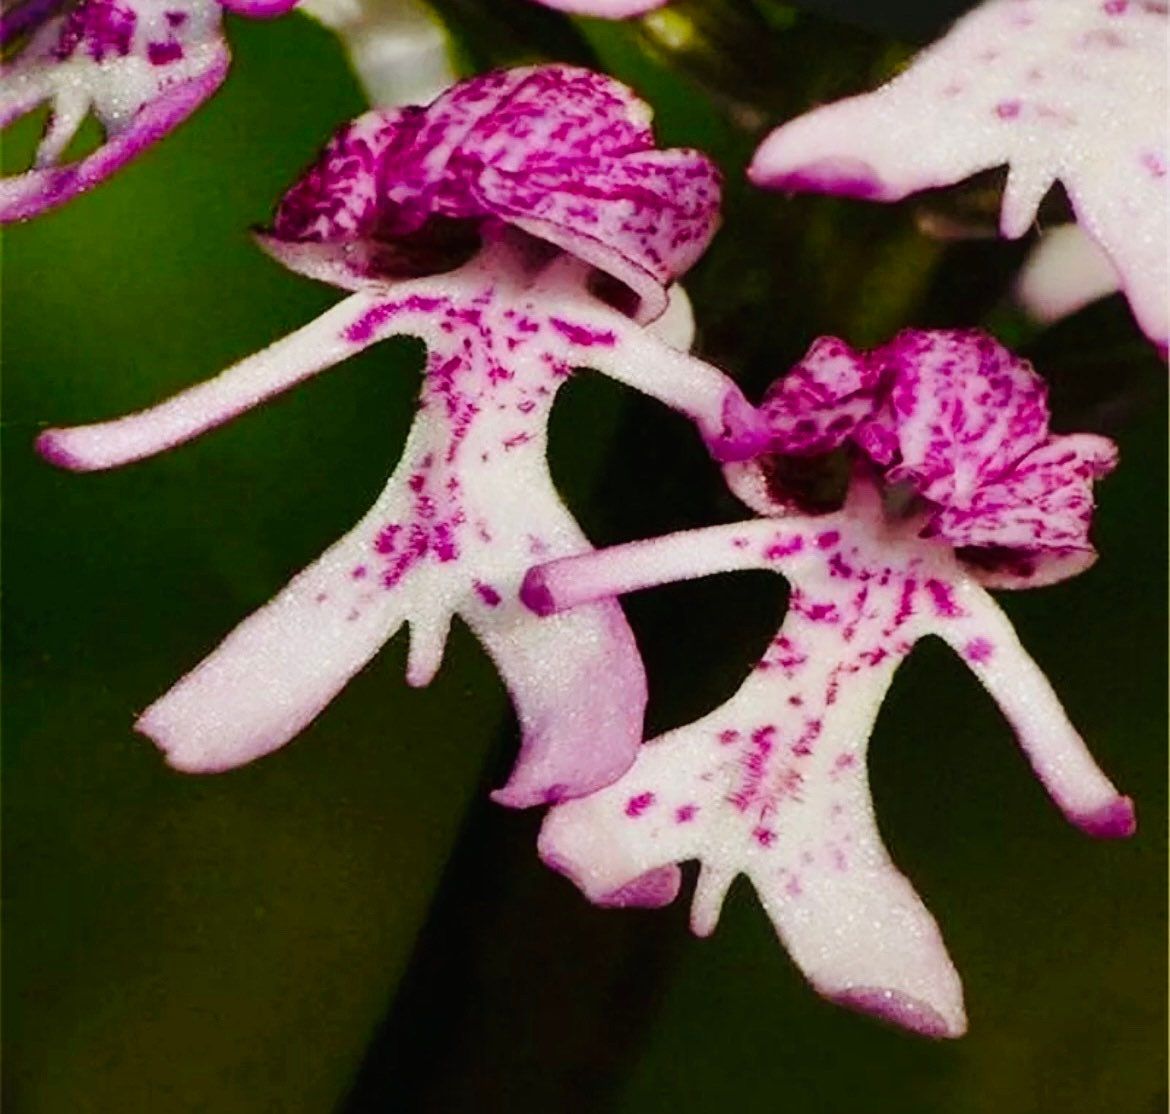
hanging naked plant Naked Man Orchid Seeds ~ Orchis Italica ~ Italian Orchid ~ Usual Flowers ~ Exotic Flower ~ Unique Flowers ~ Funky Plants

Sale price$24.51 Regular price$27.23
Save 10%

Pay in installments of $6.81 with ShopPay, AfterPay and Klarna

Shipping Estimate
USA
  • USA
  • CAN

Ships within 48 hours · Estimated delivery Jul 21 - Jul 26

Promo Codes Available:

For Your Every Summer RSVP, with Code: SUMMER15

Description

hanging naked plant Naked Man Orchid Seeds ~ Orchis Italica ~ Italian Orchid ~ Usual Flowers ~ Exotic Flower ~ Unique Flowers ~ Funky PlantsThe naked man orchid (Orchis italica) is a species of orchid from the Mediterranean region, named for its flowers that resemble tiny, hatted, naked men with discernible limbs. These pale to dark pink flowers grow in dense clusters on a stalk, preferring partial shade and low nutrient soil, and are known for their unique appearance and association with virility in Italy. ~ Includes ~ ~ Quantity of Seeds Your Choice : 5 Seeds 10 Seeds 15 Seeds 20 Seeds

The naked man orchid (Orchis italica) is a species of orchid from the Mediterranean region, named for its flowers that resemble tiny, hatted, naked men with discernible limbs. These pale to dark pink flowers grow in dense clusters on a stalk, preferring partial shade and low-nutrient soil, and are known for their unique appearance and association with virility in Italy.

~ Includes ~

~ Quantity of Seeds Your Choice  :
5 Seeds
10 Seeds
15 Seeds
20 Seeds

~ Grow and Care Instructions.

* Starter Grow Kits also available, as shown in the last photo.

✨ Follow Me ✨

Instagram: YourPlantBitch

Facebook: Your Plant Biitch


💗Orchid Grow and Care Instructions 💗

*Please Note : Orchid seeds are EXTREMELY TEENY TINY (DUST LIKE)!!! In fact, orchid seeds are the smallest of all flowering plants!!! Please be careful when opening!!! I recommend opening their package over a white piece of paper, in a draft/wind free environment.

~ Grow Instructions ~

  • Step 1: Combine 4 parts peat moss, 3 parts sphagnum moss, 1 part perlite and 1 part mycorrhizal fungi granules to create a well-draining, soilless growing medium that will encourage the seeds to germinate successfully. Add the soilless growing medium to a 4-inch planting container; choose a container with at least two 1/4-inch holes in the bottom to ensure healthy drainage.
  • Step 2: Hold the planting container under room-temperature running water until you see it streaming from the drainage holes. Leave the container in the sink for five to 10 minutes to allow any excess water to drain from the growing medium.
  • Step 3: Mix the seeds with the horticultural sand. Then pour it evenly over the surface of the moistened soil. Sprinkle the sand and seed mixture evenly over the surface of the moistened growing medium.
  • Step 4: Position the seeds in a site that receives filtered sunlight for at least five hours a day. Water the seeds as often as necessary to keep the growing medium lightly moistened; provide 1/2 cup of water each time you irrigate.
  • Step 5: Transplant the seedlings to individual 6-inch planting containers when they grow to 6 to 8 inches. Fill the containers with a mixture of 4 parts peat moss, 3 parts sphagnum moss, 2 parts loam, 1 part perlite, 1 part redwood bark and 1 part mycorrhizal fungi granules. Plant the seedlings at the same depth they grew in their original container.


~ Care Instructions ~

Light: Moderate to bright light, no direct sun. They need bright, indirect sunlight to bloom. They also do well under fluorescent lights.

Water: Keep mix evenly moist at all times. They prefer more moisture than epiphytic orchids. And if you keep your orchid under grow lights, it’ll need watering more often. Just don't overdo it. Too-frequent watering can cause root rot.

Humidity: Requires moist air - preferably 50-60% relative humidity. Set a pot on a tray of wet pebbles and mist leaves daily with room-temperature water. Or use a room humidifier. Dry air can be deadly to orchids. A wet pebble tray, cool-mist room humidifier or regular misting will help to maintain at least 50% humidity that will keep your orchids happy. Coming together as a group raises the humidity around these moisture-loving orchids. Or perhaps they just like the distinguished company.

Temperature: 60-65°F/16-18°C nights and 75-80°F/24-27°C days. To ensure blooming, give your orchid slightly cooler nighttime temperatures. A 15° difference will do.

Soil: Orchid potting mix or 2 parts fine-grade fir bark: 1 part perlite or sand: 1 part sphagnum moss.

Fertilizer: Feed with an organic orchid fertilizer, or fish emulsion, twice a month during the growing season.

Propagation: Division. Pull or cut the fans of the leaves apart into clumps of at least 2-3 growths.

💕 Please visit YourPlantBitch and explore all of my new and exclusive collections. Rest assured, my main concern is my customers always!!! I try to provide the best customer service and strive to create a positive shopping experience for my customers. I’m always available to answer any questions or concerns you may have before and after your purchase. Custom orders are welcome!!! I can even include a handwritten gift card for no additional cost. Feel free to send me an offer, I will always do my absolute best to work with my customer’s offers. Contact me with any questions or if you’re interested in my sold~out items or need different quantities.

💕Awesome reviews ALWAYS appreciated!!! Thank you so very much for supporting my small business!!!

🪴Happy Planting🪴

💚 Best Wishes, Your Plant Bitch (Quinn)


Shipping Notes
  • Free Standard Shipping on $100+ Orders to the USA.
  • Except Preorder products are shipped in 48 hours.
  • Delivery to the USA:
  1. Standard Shipping : 3-10 business days
  • If time is of the essence, please consider selecting expedited delivery for faster service.
Exchange/Return Notes
  • We offer a 30-day return/exchange service after receiving.
  • Final sale items are not eligible for returns or exchanges.
  • To process your return/exchange, please contact us at [email protected]
  • Please click here for more details>>> Return & Exchange Policy
SKU: 20161893471

Discover Niche Categories That Outsell hanging naked plant

Top-Converting Item to Boost Your Average Order

4.7 ★★★★★
Based on 12 reviews
Sort
Highest Rating
Newest First
Oldest First
Product Reviews
C
Verified Purchase
Christina Mellies
Draper, US
★★★★★ 5
Poli Glow used on bottom portion of the picture
Just put it on 21 foot RV, was impressed with the shine. Key is to make sure the applicator is moist. I periodically dampen with water. Realizing it wasn't going to revive the stickers. Question is How long it will last? What will it look like after it rains? Pictures attached, bottom portion was done with poli glow on June 7,2026 and I have just under a half of bottle left. Maybe I will update once it rains or how long the shine last.
WAS THIS REVIEW HELPFUL?YesReportShare
Reviewed in the United States on June 8, 2026
D
Verified Purchase
Diego
Omaha, US
★★★★★ 5
It works miracles
I was amazed by the incredible difference it made on my RV. Check the pictures. The difference is of such a magnitude that we were amazed by the final results. Brought my rig back to life
WAS THIS REVIEW HELPFUL?YesReportShare
Reviewed in the United States on December 1, 2025
A
Verified Purchase
Amy Biggs
Lowell, US
★★★★★ 5
40 Years Young and Ready to Bring My RV Back to Life!
As a happy 40-year-old guy who takes a lot of pride in his RV, I’ve been on a mission to remove all the oxidation and restore that clean, glossy finish. After doing my homework, I decided to try Poli Glow Boat & RV Restoration, and I couldn’t be more excited about the results so far. I honestly can’t wait to see what it looks like once I’m completely finished. The quality of this product really stands out. It doesn’t feel like some quick temporary fix — it’s clearly made to properly restore fiberglass surfaces. The application use is straightforward, especially if you follow the prep steps carefully. Once I got into the rhythm of it, the process felt manageable and even kind of satisfying. What impressed me most was the smoothness it brought back to the surface. Areas that were dull and chalky from oxidation are starting to look deep and refreshed again. It’s doing a solid job with light scratch removal too, especially the small surface marks that naturally build up over time. I also appreciate the added layer of durability it promises. After putting in the work, I want something that’s going to last and protect the finish moving forward. And for anyone dealing with minor staining or corrosion spots, it definitely helps improve the overall look, contributing to better rust removal results around metal fixtures and trim. If you’re like me and want your RV looking proud and road-ready again, this feels like a serious step in the right direction. I’m genuinely excited to see the full transformation once I finish the entire exterior. Definitely worth the effort.
WAS THIS REVIEW HELPFUL?YesReportShare
Reviewed in the United States on February 19, 2026
A
Verified Purchase
Amazon Customer
Alexandria, US
★★★★★ 5
Great product, great support, looks better than new!
I couldn't possibly be more pleased with how my RV looks after Poli-Glow! I have a 2018 Rockwood 21' RV trailer that had not been treated before, so there was oxidation / fading from being in the Arizona sun - it just looked dull (the color is mostly beige). I am not usually a DIY'er. I researched options online and really appreciated the educational videos on Poli-Glow so I went with that. I don't have buffer machine or anything like that so I liked the idea of being able to do everything by hand. (Even if I had a buffing machine, I think that would have been more tiring having to climb a ladder with it and holding it over my head while applying a traditional wax - plus having to change between it and buffing cloths before wax would dry). Plus I like that this is a longer lasting treatment than a traditional wax. You will need some time - I spread my project over 4 days (day 1 - cleaning the RV and separate UV protection of the roof and awning; day 2 - Poli-Prep the whole RV; day 3 and day 4 Poli-Glow half the RV day 3 and finish day 4). Doing the Poli-Prep was easy. I mixed it in a spray bottle. I hosed down the section of the RV I was getting ready to scrub, sprayed on the Poli-Prep, scrubbed the area with the scrub brush that came with the kit, then hosed the area down and let it air dry. I only used about a third of the bottle of Poli-Prep. After the Poli-Prep the RV looked better than it did before, but that's not where the real shine comes from. I appled Poli-Glow to the RV surface, over the decals, plus all the black trim areas. The coats dried quickly so I didn't have any extra downtime between coats. When I finished a coat I walked about 30 feet to my working station in the shade, added more Poli-Glow to the mitt, and by the time I got back to the RV the previous coat was dry and ready for the next coat. Overall I worked a side of the RV from left to right; within a section I started on the bottom section up to almost as high as I could reach and used a ladder for the top half. The first coat get absorbed pretty thoroughly so the area looks only partially polished; by the 2nd - 3rd coat the shine really starts to show. Since I am in AZ, I applied the recommended 10 coats of Poli-Glow (10 coats to about a 5 to 6 foot section, then move the ladder to the next section). Overall I used 2 bottles of Poli-Glow with about a half inch left in the bottle. I did time my efforts both days to work on sections that weren't in the direct sun, making sure the area I would work on was cool or warm, not hot. Support was SUPER-FANTASTIC! I sent questions via Amazon contact seller and received very fast responses. They also sent me an email link to other videos from a detailer, so by the time I started I was confident and ready. During the project I sent pictures and they provided fast feedback that I was in fact progressing very well - very encouraging and confidence boosting. Thank you Sean! So yes, it took some time, but it was so worth it! It is shiny and beautiful and looks like new (actually better than new)! My neighbor has already asked me about it so he can do his RV. After I was done I took my victory lap - I sat in my driveway staring at it while sipping a beer, basking in the reflection of the sunset mirroring off the RV!
WAS THIS REVIEW HELPFUL?YesReportShare
Reviewed in the United States on March 13, 2026
C
Verified Purchase
Cindy
Chelsea, US
★★★★★ 5
Oxidized fiberglass RV looks new again!
WOW! I researched high and low for a product that would bring back the shine to our 10 year old travel trailer that has fiberglass panel siding. There were countless videos watched, numerous products tried without success and then I discovered PoliGlow Restoration Fiberglass Kit for boats and RVs. It came with the cleaner and pad to remove the oxidation and a bottle of Superior Fiberglass Restoration, Protection and Shine. This product is amazing. The condition on the exterior of our RV had become a bit embarrassing, but now it shines with the newest of them. The instructions are easy to follow, there are even videos of the process! It does require several coats of the Restoration and Shine product. The cost is extremely reasonable for the end result of the RV. The shine is amazing! Highly recommend this product. PS It was extremely easy to apply as I had my husband do it, he didn’t complain at all and was thrilled with the result!
WAS THIS REVIEW HELPFUL?YesReportShare
Reviewed in the United States on July 24, 2025

recommand products