SKU: 22271461226
california wonder 300 tmr sweet pepper garden seeds

california wonder 300 tmr sweet pepper garden seeds California Wonder 300 TMR Bell Pepper

Sale price$25.00 Regular price$27.78
Save 10%

Pay in installments of $6.95 with ShopPay, AfterPay and Klarna

Shipping Estimate
USA
  • USA
  • CAN

Ships within 48 hours · Estimated delivery Aug 11 - Aug 16

Promo Codes Available:

For Your Every Summer RSVP, with Code: SUMMER15

Description

california wonder 300 tmr sweet pepper garden seeds California Wonder 300 TMR Bell PepperCalifornia Wonder 300 TMR Bell Pepper is bigger, faster, stronger! The improved open pollinated heirloom variety of the industry favorite California Wonder! This variety produces a 4. 5 inch long large thick walled, tender, and flavorful pepper that is perfect for slicing and stuffing. Try it sliced or grilled, and in vegetable trays, salads, stuffed peppers, and baked dishes. A rich source of Vitamin C. Known for its high yield, this pepper variety

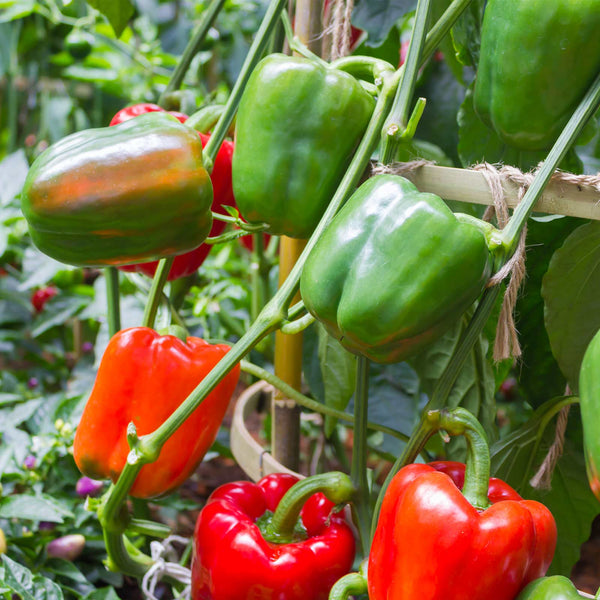
California Wonder 300 TMR Bell Pepper is bigger, faster, stronger! The improved open-pollinated heirloom variety of the industry favorite California Wonder!  This variety produces a 4.5 inch-long large thick-walled, tender, and flavorful pepper that is perfect for slicing and stuffing. Try it sliced or grilled, and in vegetable trays, salads, stuffed peppers, and baked dishes. A rich source of Vitamin C. Known for its high yield, this pepper variety is reliable and productive, providing an abundant harvest throughout the growing season. California Wonder starts green and ripens to red if left on longer. California Wonder 300 TMR Bell Pepper is also adaptable to a variety of climates, making it a great choice for gardeners in different regions.

Also Known As: California Wonder Pepper, TMR California Wonder Bell, California Wonder 300, Wonder Pepper, Bell Pepper Wonder, TMR Bell Pepper, Sweet Bell Pepper, Red Bell Pepper, Sweet Pepper, Capsicum annuum, Large Bell Pepper.

Plant Name: Pepper, California Wonder 300 TMR
Latin Name: Capsicum anuum
Days to Germinate: 14-21
Days to Harvest: 78
Plant Height: 18 - 30 Inches
Spread: 18 - 24 Inches
Growth Habit: Bush, Upright
USDA Zones: 4-11
Lifespan: Annual, Perennial in Zones 9-11
Brand: TomorrowSeeds
Sunlight: Full Sun, Partial Shade
Pollination: Heirloom, Open-Pollinated
GMO: No
Fungicide-Treated Seeds*: No
Seeds Packed For**: 2026
*Fungicide-treated seeds protect the seedlings from diseases until they are up and growing. Do not eat treated seeds.
**Seeds are freshly packed for the growing season of the year listed. Seeds are still viable beyond pack date. Store in a cool and dry location such as the refrigerator or basement to best preserve germination rates.


Planting Instructions:

Soil Preparation:

Choose an area with heavy, well-draining soil that receives at least 6 hours of sunlight each day. Remove weeds, large rocks, and litter from the planting area. Leave small weeds and dead grass, they will enrich the soil when turned under. Spade or till the soil 8-12 inches deep. Loosening the soil will help the plant establish strong roots.

Plants grow best in soil with lots of organic matter. You may optionally add fertilizer or organic material such as compost, leaves, or rotted hay to mix into the soil at this point. For small gardens, scatter 2-3 tablespoons of a complete fertilizer evenly and work into the top 2-3 inches of soil for each hill or 2 foot by 2 foot planting area. For larger gardens, scatter 2-3 pounds of a complete fertilizer for each 100 square feet of planting area. Work fertilizer or organic material into the soil and leave the surface smooth.

Form rows of soil beds 4-6 inches high and at least 3 feet apart. This formation of ridges will help with drainage.

Planting:

Peppers grows best in warm weather, with ideal temperatures of between 65F-80F during the day and nighttime temperatures of between 60F-70F.

Starting Indoors: For an earlier pepper harvest, you may optionally start planting indoors in containers 8-10 weeks before the last expected frost date in Spring, keeping seedlings at least 70F. Harden off then transplant seedlings outdoors in a sunny location when the soil temperature is above 65F. To transplant seedlings, prepare a transplant hole outdoors in a sunny location. Remove the plants carefully from the pots or flats and set them in the holes, burying some of the stem in the ground. Pack the soil loosely around the plant and leave a slightly sunken area around each plant to hold water. Water the plants after transplanting.

Directly Sowing: If directly sowing peppers outdoors, plant peppers in late spring when the soil warms to at least 65F. Fall planting is not typically recommended but is possible in climates with mild winters, with consistent 70-80F conditions, or if growing indoors >70F and using supplemental grow lights.

To plant, make holes 1/2 inch deep and spaced 18 inches apart down the rows of raised beds. Plant 2-3 seeds per hole. If choosing to thin to the strongest plant, determine the strongest and healthiest plant, then remove all other plants, narrowing to a single plant per hole. Cover seeds thinly with soil and water after planting.


Planting Depth: 1/2 inch
Within-Row Spacing: 18 inches
Between-Row Spacing: 3 feet


Care During the Season:

Watering: Water the plants deeply, soaking the soil to a depth of 6-8 inches, once to twice a week. If there is no rainfall, water 3-4 times a week. Sandy soils may need to be watered more often than heavy clay soils. Mulching around plants can help retain moisture.

Weeding: Keeping plants weed-free improves production. If plowing or hoeing, do not dig deeper than 1 inch to prevent from cutting the feeder roots.

Fertilizing: Once seedlings are established, 2-3 weeks after germination, you may optionally apply 2 tablespoons of a complete fertilizer around each hole, or 1-2 pounds per 100 square feet, without letting the fertilizer touch the plants. Optionally, continue fertilizing every 1-2 weeks as plants grow. Water plants after fertilizing.

Insecticides: Insecticides may be used to protect plants. Bt-based insecticides and sulfur are organic options that can be used for prevention. Sulfur also has fungicidal properties and helps in controlling many diseases. Before using a pesticide, read the label and follow cautions, warnings and directions.

Diseases: If spots or mold appear, treat plants with an approved fungicide. Neem oil, sulfur, and other fungicides may be used. When using fungicides always follow label directions.

Harvesting:

Bell peppers are ready to harvest when they reach their full size, about 3-4 inches long. They can be picked green or allowed to ripen to their mature color, such as red, yellow, orange, or purple, depending on the type. Peppers left to ripen fully on the plant will develop sweeter and more complex flavors. To harvest, use scissors or garden shears to cut the pepper from the plant, leaving a short stem attached to prevent damage.

Shipping Notes
  • Free Standard Shipping on $100+ Orders to the USA.
  • Except Preorder products are shipped in 48 hours.
  • Delivery to the USA:
  1. Standard Shipping : 3-10 business days
  • If time is of the essence, please consider selecting expedited delivery for faster service.
Exchange/Return Notes
  • We offer a 30-day return/exchange service after receiving.
  • Final sale items are not eligible for returns or exchanges.
  • To process your return/exchange, please contact us at [email protected]
  • Please click here for more details>>> Return & Exchange Policy
SKU: 22271461226

Discover Niche Categories That Outsell california wonder 300 tmr sweet pepper garden seeds

Top-Converting Item to Boost Your Average Order

4.4 ★★★★★
Based on 20 reviews
Sort
Highest Rating
Newest First
Oldest First
Product Reviews
J
Verified Purchase
Jason M. Massaro
New York, US
★★★★★ 5
Very impressed, perfect shot of espresso with exceptional creme, compact, excellent value.
Color: A-Silver, Color: A-Silver
I am **very** impressed with this sleek, espresso machine. The Casabrews 5418 PRO is phenomenal and such a great value. The pros and cons are very well set out by Neo Pam in her review of December 8, 2025. The machine heats up almost instantaneously and brews a perfect shot and double shot of espresso. It is very easy to use and clean and the instructions are helpful. I really like the compact size. Note that I drink almost exclusively espresso so I make no comment on the steamer other than to say I tested it and it produces copious amounts of very hot steam. Be careful in pushing the wand back--it gets very hot. This was a great purchase and I enjoy it every morning!!
WAS THIS REVIEW HELPFUL?YesReportShare
Reviewed in the United States on March 17, 2026
N
Verified Purchase
Nidan Jutsu
San Leandro, US
★★★★★ 5
Fast and Easy! Great Taste!
Color: A-Silver
This is my first espresso machine. The first thing you should know is to select the right beans -- especially if you choose the bottomless portafilter (optional, but recommended.) I bought a bag of Starbucks non-espresso dark roast beans, and it couldn't get to the espresso pressure in the bottomless filter; those beans are too oily for espresso. Their dark roast espresso beans work great, though. Here's why this is the best Casabrews machine (in my opinion.) The "Flash heat" tech is ready to brew FIVE SECONDS after hitting the power button (feels more like 3.) There are machines that take anywhere from 30 seconds to about 20 minutes to heat up. I don't know about you, but I don't like waiting. This same tech is ready to froth milk 5 seconds after brewing. You can't froth at the same time, but you're already potentially on your daily limit of caffeine while your "friends" are still waiting for their clunky machines with double boilers to warm up..! I've used mine daily since late November. If you have hard water, you will have to descale more often (I've done it once so far.) In my case, I use a Kangen filter on the 11.5 (alkaline) setting. This causes faster buildup, but the taste is worth it, and I've always used 11.5 pH for all coffee--drip and Keurig. I use 17.5g of those Starbucks beans -- different beans may require different amounts. If you overfill the basket, you will get more steam and dripping. If you underfill it, you won't hit espresso pressure and it will taste weak and sour due to underextraction. I prefer tending toward overextraction. This could cause some bitterness, but that's easily-fixed by adding a few pinches of salt (I use Himalayan Sea Salt) or some almond milk. The punch and complexity are worth it, though -- it's the SOUL of the beans! ⚡😍🤩💪🏼 I've also used preground espresso, but it won't be quite as strong. That works fine with the pressurized double basket that comes with this machine -- but it won't reach pressure with the bottomless basket. The long-ground grains have lost their potency. I drink this if it's already early evening or later--so I could actually SLEEP! Two things you'll want to get right away are a WDT tool (a bunch of needles like a long comb) and a "knock box" (where you tap the filter to remove the leftover coffee puck.) I 3D-printed a knockbox from Thingiverse.com Make sure you select enough infill and 4 walls because it'll have to take a lot of abuse. It also helps to have a dosing funnel (also 3D-printed from there.) Any concerns about food grade stuff is addressed by either buying PET-G food grade filament or wet-sanding (which I opted for.) The WDT tool breaks up the coffee clumps, and you'll want to stir it down and into the arcs of the filter to prevent sputtering, uneven flow, and bad espresso. I also have a 3D-printed distributor--but many consider it unnecessary. I like it because it helps to center the grinds and then I tamp it down (I got an aftermarket tamper--one that has ridges; it works better than the flat ones.) I have a flat metal tamper, too. I just don't use it. Making a double takes about 5 minutes--starting from grinding beans, weighing, transferring, stirring, tamping, putting on the included puck screen and attaching the portafilter. After that, you just press the button. I always get 3 streams that consolidate into one, and good crema (a bit of foam.) I use a digital Etek scale (~ $10.) On scale use... My Etek can measure volume. But there are TWO settings. One is for milk (slightly different density) and one is for water. The one for water is approximately the same as the gram unit setting--as water is 1 gram per milliliter. Make sure if you are leaving it on the milliliter setting that you are using the water one. It has a drop icon. The milk setting has a cup with an "M" on it. You will put too much coffee in if you try to measure it with the milk setting. I found that out recently, as I was not aware of the separate setting for milk. So LIVE and LEARN! 🤓📈📊 If the machine gets accumulated mineral deposits, I take a straightened paper clip and carefully (VERY) insert into the hole in the mounting plate. I then run 2-3 doubles without the portafilter. If it gets more far-gone, I use citric acid (1 tablespoon per liter of water.) You could buy some descaling powder from a dollar store, but I think citric acid is more economical. I use it on my Kangen machine which is why I had it. You will then want to run a few cycles of doubles through to get rid of any aftertaste. You might be tempted to use vinegar and water. I used that on my Keurig and I had to run probably 6 or more cycles to get the vinegar taste out; I don't recommend it! Make sure you run some hot water through the frothing tube after each use -- and wipe it down to remove the milk before it gets too solidified. This is done by turning the dial all the way back to the left, having the machine on, and then turning it all the way to the right. After you see the flow is constant (not sputtering or uneven--I watch for about 5 seconds), turn the dial back to the far-left. That's it! This machine has changed my morning routine. I eat grits and a fried egg with it so I don't bounce off into the stratosphere on a caffeine high. The taste is quite good. I very rarely drink drip coffee (or even use it or the Keurig for coffee) since having this resource. Being away from home is hard, because it's hard to find good espresso -- especially at those licensed "Starbucks." Those are the ones that just pay to use their materials, but are not the genuine deal. Let me know how yours works out, how it tastes, and if you have any questions! 💯 Note: I made the video before I started using other tools mentioned, above.
WAS THIS REVIEW HELPFUL?YesReportShare
Reviewed in the United States on April 15, 2026
E
Verified Purchase
Elizabeth C
Lake Worth, US
★★★★★ 5
A must buy for espresso lovers and limited counterspace
Color: Black
If you want an espresso machine but don’t want to go though the entire massive machines this is the perfect beginning and even moderate espresso maker for you! So much you can do with it, makes a great solid shot of espresso. No concerns so far and fast and easy to learn steps. Recommending this to all our friends and family that are interested
WAS THIS REVIEW HELPFUL?YesReportShare
Reviewed in the United States on April 14, 2026
R
Verified Purchase
Raysa
Grantham, US
★★★★★ 5
Great value for your money!
Color: A-Silver
Yessss! Real espresso maker! Excellent brewing capacity. Easy to use. Made with great quality material. The machine comes with all the pamphlets & easy to read instructions which say to heat twice for extra hot coffee, but honestly the coffee comes out VERY hot & tasty without double-heating. Also comes carefully packaged to prevent damage during delivery. Great value for your money!
WAS THIS REVIEW HELPFUL?YesReportShare
Reviewed in the United States on April 10, 2026
J
Verified Purchase
Joe Martin
Los Angeles, US
★★★★★ 4
Plastic, but Well Performing Machine
Color: A-Silver
My household has been using the Casabrewa 5418 PRO multiple times a day for over a month now. It's function and directions are excellent. With some experimenting, it makes acceptable and delicious espresso. This is an entry model machine that does exactly what you want it to. It heats fast and produces espresso fast. However, for the price point the amount of plastic is a bit disappointing. The machine has the appearance of being stainless steel while being constructed almost entirely of plastic. If you want an entry level espresso machine and you don't mind the plastic, this is an excellent option.
WAS THIS REVIEW HELPFUL?YesReportShare
Reviewed in the United States on November 5, 2025

recommand products