Pay in installments of $5.37 with
 ,
,
 and
and

Shipping Estimate
USA
- USA
- CAN
- USA
- CAN
Ships within 48 hours · Estimated delivery Oct 20 - Oct 25
 Promo Codes Available:
For Your Every Summer RSVP, with Code: SUMMER15
Description
walnut seeds for planting Carpathian English Walnut Tree Seeds - For 2026 Planting Juglans RegiaCarpathian Walnuts are large, round, rich flavored walnuts that are encased thick, hard shells. These Old World English walnuts feature excellent resilience to cold climates, with the ability to withstand temperatures as low as 20F ( 29C) without damage, making them suitable for growing in regions with harsh winters. These robust deciduous trees can reach heights of 40 60 feet with a spread of 30 50 feet and feature broad, spreading canopies with
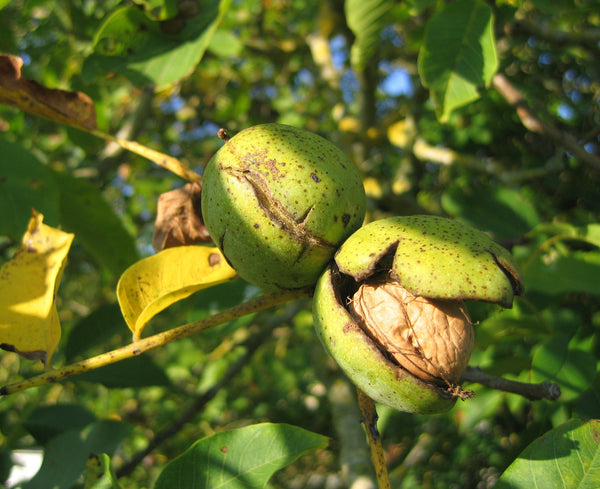
Carpathian Walnuts are large, round, rich-flavored walnuts that are encased thick, hard shells. These Old-World English walnuts feature excellent resilience to cold climates, with the ability to withstand temperatures as low as -20°F (-29°C) without damage, making them suitable for growing in regions with harsh winters. These robust deciduous trees can reach heights of 40-60 feet with a spread of 30-50 feet and feature broad, spreading canopies with large, pinnate leaves that are perfect for creating a shaded area in your garden. Simply harvest these hardy English Walnuts in late fall once the husks start to split and allow them to dry thoroughly before cracking open and enjoying the delicious nuts for snacking or culinary use. Its durable wood is also prized for construction, furniture, and flooring.Also Known As: Carpathian Walnut, English Walnut, Persian Walnut, Royal Walnut, Madeira Walnut, Common Walnut, European Walnut, Hard Shell Walnut, Carpathian Walnut Tree, Hardy Walnut, Carpathian Nut, Regal Walnut.
| Plant Name: | Tree, English Walnut |
| Latin Name: | Juglans regia |
| Days to Germinate: | 14-28 |
| Years to Fruit: | 8 - 10 Years |
| Plant Height: | 40 - 60 Feet |
| Spread: | 30 - 40 Feet |
| Growth Habit: | Upright |
| USDA Zones: | 4-9 |
| Lifespan: | Perennial |
| Brand: | TomorrowSeeds |
| Sunlight: | Full Sun, Partial Shade |
| Pollination: | Heirloom, Open-Pollinated |
| GMO: | No |
| Fungicide-Treated Seeds*: | No |
| Seeds Packed For**: | 2026 |
**Seeds are freshly packed for the growing season of the year listed. Seeds are still viable beyond pack date. Store in a cool and dry location such as the refrigerator or basement to best preserve germination rates.
Planting Instructions:
Soil Preparation:
Choose a clear, sunny location that is not in the shade of other trees and receives at least 6 hours of sunlight each day. Trees establish roots better in sandy, well-drained soils rather than heavy, poorly drained soil. Remove weeds, large rocks, and litter from the planting area. Leave small weeds and dead grass, they will enrich the soil when turned under. Spade or till the soil 6-8 inches deep. Loosening the soil will help the plant establish strong roots. If the soil is heavy or clay-like, mix in some sand or compost to improve drainage. Optionally, either form rows of soil beds or hills 4-6 inches high and at least 15 feet apart. This formation of ridges will help with drainage, ensure good airflow, and make harvesting or maintenance easier. Lay down 1/2"-3/4" peat moss, sawdust, or potting soil, the soil surface. This layer is beneficial because it can the improve the germination environment and prevent soil crusting.
Planting:
Starting Indoors: Seeds require cold, moist stratification to break dormancy. Remove the outer husk and soak the walnuts in hot tap water and let stand for 24 hours prior to sowing. To stratify, roll seeds in a damp paper towel and place in a resealable bag. Place the bag in the refrigerator to keep seeds at 35F-40F for 90-120 days, mimicking winter conditions. After the stratification period, seeds should be ready to germinate. To germinate seeds, place the bags in a warm 70F-90F area. Check every other day. Once roots are visible, sow in moist potting soil and place in a sunny area that is at least 65F, about 1 month after the last expected frost in spring. Keep the soil moist, allowing the top inch of soil to dry in between waterings.Once the seedlings have developed a few sets of leaves and are at least 6 inches in height, harden off seedlings then transplant outdoors in the spring, in a sunny location when temperatures are consistently above 65F. To transplant seedlings, prepare a transplant hole outdoors in a sunny, permanent location. Remove the plants carefully from the pots or flats and set them in the transplant holes, burying some of the stem in the ground. Pack the soil loosely around the plant and leave a slightly sunken area around each plant to hold water. Water the plants after transplanting.
Directly Sowing: If directly sowing outdoors, plant seeds in late summer to naturally cold-stratify seeds. Remove the outer husk and soak the walnuts in hot tap water and let stand for 24 hours prior to sowing. To plant, make holes 1-2 inches deep and spaced 30-40 feet apart down the rows of raised beds. Plant 1 seed per hole, then cover thinly with soil. Seedbeds can be covered with plastic film to promote germination. Water after planting.
| Planting Depth: | 1-2 inches |
| Within-Row Spacing: | 30-40 feet |
| Between-Row Spacing: | 40 feet |
Care During the Season:
English Walnut Tree will produce healthy growth, strong branches, and abundant walnut yields year after year with care. During spring and summer, young trees need regular deep watering, especially in dry conditions, to establish strong root systems, while mature trees are more drought-tolerant but still benefit from occasional watering during extended dry spells. Applying a layer of mulch around the base helps retain soil moisture and suppress weeds. Optionally, as the season progresses, additional fertilizer rich in phosphorus and potassium can support nut production. Pruning is best performed in late winter or early spring, before new growth begins, to remove dead or weak branches and improve airflow, which helps prevent disease. As the growing season progresses toward late summer and early fall, watering should be gradually reduced to encourage nut ripening.
Harvesting:
English Walnut can be harvested in late summer to early fall, usually between September and October. The best time to harvest is when the green outer husks begin to split open, revealing the hard brown shell inside. This indicates that the nuts are mature and ready for collection. To harvest, shake the tree gently or use a pole to knock down the nuts, then gather them from the ground. Promptly remove the husks, as leaving them on too long can stain the shell and affect the nut’s quality. After husking, rinse the walnuts thoroughly and allow them to dry in a well-ventilated, shaded area for two to three weeks, turning them occasionally to ensure even drying. Proper drying is crucial to prevent mold and spoilage. Once fully dried, store the walnuts in a cool, dry place, in breathable bags or containers to maintain freshness.
Shipping Notes
- Free Standard Shipping on $100+ Orders to the USA.
- Except Preorder products are shipped in 48 hours.
- Delivery to the USA:
- Standard Shipping : 3-10 business days
- If time is of the essence, please consider selecting expedited delivery for faster service.
Exchange/Return Notes
- We offer a 30-day return/exchange service after receiving.
- Final sale items are not eligible for returns or exchanges.
- To process your return/exchange, please contact us at [email protected]
- Please click here for more details>>> Return & Exchange Policy