SKU: 33864236781
money seed plant

money seed plant Money Plant (Lunaria) Seeds - For 2026 Planting Non-GMO Heirloom

Sale price$23.35 Regular price$25.94
Save 10%

Pay in installments of $6.49 with ShopPay, AfterPay and Klarna

Shipping Estimate
USA
  • USA
  • CAN

Ships within 48 hours · Estimated delivery Sep 21 - Sep 26

Promo Codes Available:

For Your Every Summer RSVP, with Code: SUMMER15

Description

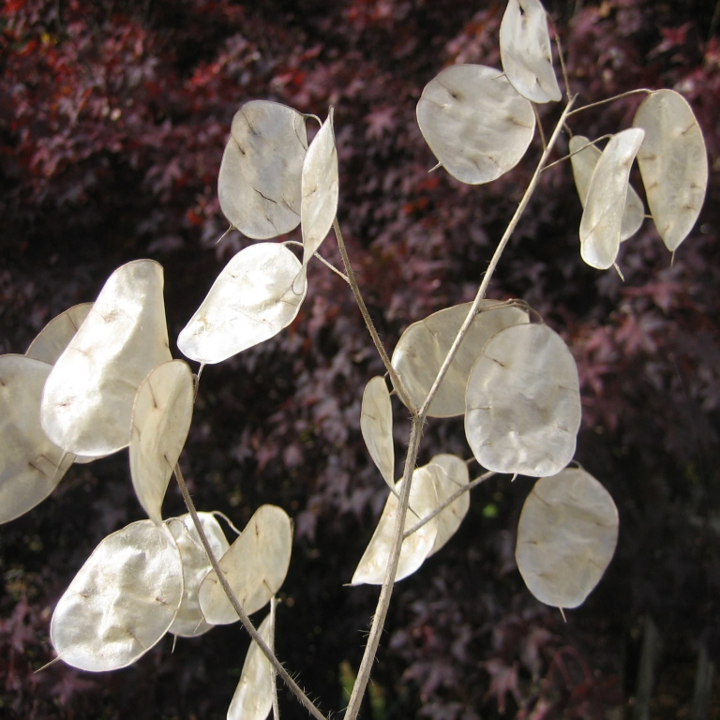
money seed plant Money Plant (Lunaria) Seeds - For 2026 Planting Non-GMO HeirloomMoney may not grow on trees, but it does grow on wildflowers! Money Plant, or Silver Dollar Plant, is an intriguing perennial featuring silvery translucent seedpods that grow to the size of silver dollars. They have been popular in dried flower arrangements since colonial times. The silvery seed pods can be harvested and dried to create stunning, long lasting arrangements or used in crafting projects. As the fragrant purple and white flowers bloom in

Money may not grow on trees, but it does grow on wildflowers! Money Plant, or Silver Dollar Plant, is an intriguing perennial featuring silvery translucent seedpods that grow to the size of silver dollars. They have been popular in dried flower arrangements since colonial times. The silvery seed pods can be harvested and dried to create stunning, long-lasting arrangements or used in crafting projects. As the fragrant purple and white flowers bloom in early spring, they attract pollinators like bees and butterflies, adding even more life to your garden. Lunaria is perfect for adding texture and interest to garden beds, borders, or floral arrangements. Money Plant is a low-maintenance plant that thrives in a variety of soils and requires minimal care, making it ideal for gardeners of all experience levels. Not only does it add a touch of elegance to your outdoor space, but Money Plant also symbolizes prosperity and good fortune, making it a perfect plant for bringing positivity into your garden or home.

Also Known As: Money Plant, Honesty, Moonflower, Silver Pennies, Chinese Money, Lunaria, Silver Dollar Plant, Annual Honesty, Perennial Honesty, Silver Dollar, Moonwort, Chinese Lantern, Satin Flower.

Plant Name: Money Plant
Latin Name: Lunaria annua
Days to Germinate: 7-14
Days to Bloom: 365-730
Plant Height: 2 - 3 Feet
Spread: 1 - 2 Feet
Bloom Diameter: 1 - 2 Inches
Growth Habit: Bush
USDA Zones: 5-9
Lifespan: Biennial
Brand: TomorrowSeeds
Sunlight: Full Sun, Partial Shade
Pollination: Heirloom, Open-Pollinated
GMO: No
Fungicide-Treated Seeds*: No
Seeds Packed For**: 2026
*Fungicide-treated seeds protect the seedlings from diseases until they are up and growing. Do not eat treated seeds.
**Seeds are freshly packed for the growing season of the year listed. Seeds are still viable beyond pack date. Store in a cool and dry location such as the refrigerator or basement to best preserve germination rates.


Planting Instructions:

Soil Preparation:

Choose an area with heavy, well-draining soil that receives at least 6 hours of sunlight each day. Remove weeds, large rocks, and litter from the planting area. Leave small weeds and dead grass, they will enrich the soil when turned under. Spade or till the soil 8-12 inches deep. Loosening the soil will help the plant establish strong roots.

Plants grow best in soil with lots of organic matter. You may optionally add fertilizer or organic material such as compost, leaves, or rotted hay to mix into the soil at this point. For small gardens, scatter 2-3 tablespoons of fertilizer evenly and work into the top 2-3 inches of soil for each hill or 2 foot by 2 foot planting area. For larger gardens, scatter 2-3 pounds of a complete fertilizer for each 100 square feet of planting area. Work fertilizer or organic material into the soil and leave the surface smooth.

Form rows of soil beds 4-6 inches high and at least 18 inches apart. This formation of ridges will help with drainage.

Planting:


Starting Indoors: For earlier blooms, you may optionally cold-stratify Money Plant seeds for at least 30 days then start planting indoors in containers 6-8 weeks before the last expected frost date in Spring, keeping seedlings at least 65F. Harden off then transplant seedlings outdoors in a sunny location when temperatures are consistently above 60F. To transplant seedlings, prepare a transplant hole outdoors in a sunny location. Remove the plants carefully from the pots or flats and set them in the transplant holes, burying some of the stem in the ground. Pack the soil loosely around the plant and leave a slightly sunken area around each plant to hold water. Water the plants after transplanting.

Directly Sowing: If directly sowing outdoors, plant after the first hard frost in early Spring to cold-stratify seeds. Plants will germinate in late Spring when the soil warms to at least 60F. Fall planting is not recommended unless planting outdoors in environments with mild, frost-free winters, or planting indoors with supplemental grow lights. For blooms in late Spring of the following year, sow outdoors after the first hard frost in Fall to cold-stratify seeds.

To plant, make holes 1/4 inch deep and spaced 12-18 inches apart down the rows of raised beds. Plant 1-3 seeds per hole, then cover thinly with soil. If choosing to thin, plant 2-3 weeds per hole, then remove plants to narrow to the strongest single plant per hole fter seedlings come up. Water after planting.


Planting Depth: 1/4 inch
Within-Row Spacing: 12-18 inches
Between-Row Spacing: 18-24 inches


Care During the Season:

Watering: Water the plants deeply, soaking the soil to a depth of 6-8 inches, once a week. If there is no rainfall, water 2-3 times a week. Sandy soils may need to be watered more often than heavy clay soils.

Weeding: Keeping plants weed-free improves production. If plowing or hoeing, do not dig deeper than 1 inch to prevent from cutting the feeder roots.

Fertilizing: Once seedlings are established, 2-4 weeks after planting, you may optionally add a complete fertilizer every 4-6 weeks during the growing season. Read and follow fertilizer instructions for best application. Water plants after fertilizing.

Insecticides: Insecticides may be used to protect plants. Bt-based insecticides and sulfur are organic options that can be used for prevention. Sulfur also has fungicidal properties and helps in controlling many diseases. Before using a pesticide, read the label and follow cautions, warnings and directions.

Diseases: If spots or mold appear, treat plants with an approved fungicide. Neem oil, sulfur, and other fungicides may be used. When using fungicides always follow label directions.

Harvesting:

To harvest Money Plant for its decorative "silver dollar" seed pods, wait until the pods have fully matured and dried on the plant, typically in late summer to early fall of the second year or growth. In the first year, Money Plant blooms showy purple and white flowers. The outer layers of the pods will first appear green, then turn brown as they dry. Once they are completely dry, cut the stems at the base using pruning shears or scissors. To reveal the silvery, translucent inner layer, gently rub or peel away the outer brown husks of the seed pods. This can be done by hand or by lightly shaking the stems. Once cleaned, the silver-dollar-like discs can be used in dried floral arrangements or crafts. Store them in a dry place to prevent moisture damage and maintain their delicate appearance.

Shipping Notes
  • Free Standard Shipping on $100+ Orders to the USA.
  • Except Preorder products are shipped in 48 hours.
  • Delivery to the USA:
  1. Standard Shipping : 3-10 business days
  • If time is of the essence, please consider selecting expedited delivery for faster service.
Exchange/Return Notes
  • We offer a 30-day return/exchange service after receiving.
  • Final sale items are not eligible for returns or exchanges.
  • To process your return/exchange, please contact us at [email protected]
  • Please click here for more details>>> Return & Exchange Policy
SKU: 33864236781

Discover Niche Categories That Outsell money seed plant

Top-Converting Item to Boost Your Average Order

4.5 ★★★★★
Based on 18 reviews
Sort
Highest Rating
Newest First
Oldest First
Product Reviews
G
Verified Purchase
Gabrila
Lake Worth, US
★★★★★ 5
Highly Recommend – Amazing Results on My Honda Accords!
Size: 1 Count (Pack of 1), Size: 1 Count (Pack of 1)
I recently used the Cerakote Headlight Restoration Kit on both my 2008 and 2014 Honda Accords, and I’m genuinely impressed. The headlights on both cars were badly oxidized, hazy, and yellowed from years of sun exposure. After following the kit’s instructions, they look crystal clear and almost like new again. The process is pretty straightforward and beginner-friendly. It does take roughly an hour per headlight set if you follow all the steps carefully and allow proper air drying time before the final clear coat. There’s a bit of elbow grease involved with the sanding and polishing stages, but nothing overly difficult. The kit provides everything you need, and the instructions are clear. The results are excellent! Both cars now have headlights that look factory-fresh. I’m really happy with how bright and clear they are at night. Best part? I saved a ton of money by restoring them instead of buying expensive OEM replacements. The only minor uncertainty is long-term durability (how well the clear coat holds up after a couple years of sun, weather, and car washes), but for the price and the dramatic improvement I saw, it’s absolutely worth it. I’d definitely buy this kit again if needed. Highly recommended for anyone dealing with cloudy headlights. Great product that delivers professional-looking results at a fraction of the cost!
WAS THIS REVIEW HELPFUL?YesReportShare
Reviewed in the United States on May 3, 2026
C
Verified Purchase
Cleaver
Massapequa, US
★★★★★ 4
Best product I've tried so far but still temporary. YMMV.
Size: 1 Count (Pack of 1)
This product really does work. It is the best I've used. I purchased in September 2024 and am writing this review in May of 2026, roughly one year and 8 months later. I noticed product failure a little after a year after application and it has been degrading slowly since. Currently the product is visible like a layer of clear paint flaking off and you can physically scratch some off. Here are the pros and cons. Pros: Clarity, relative ease of use, value Cons: Taping and sanding, doesn't last for as long as you own your car as claimed Best used as a temporary fix. Bottom line, would I use it again? Yes. What am I doing today? Replacing the headlights completely. Why? I plan on keeping my car for longer than a year.
WAS THIS REVIEW HELPFUL?YesReportShare
Reviewed in the United States on May 8, 2026
S
Verified Purchase
Sahiti
Port Orchard, US
★★★★★ 5
Review After Using on 3 Different Cars over 3 years
Size: 1 Count (Pack of 1)
Cerakote Headlight Restoration Kit : After Using on 3 Different Cars over 3 years This is my second time purchasing the Cerakote Headlight Restoration Kit, and I’ve now used it across three different vehicles. At this point, I feel comfortable saying this product genuinely works when used correctly. Before trying this kit, I considered replacing my headlights entirely. The cheapest replacement set I found was around $150 just for the parts. Installation would have required removing the grille, bumper, and other components, which adds time and complexity. For an older vehicle, that didn’t make financial sense. Instead, I chose to restore the original headlights. Cost and Value My first package cost me $17, and I restored two cars with that single kit ( about 9$ per pair). That alone made it worth it. For under $20: I restored two separate vehicles Avoided buying new headlight assemblies Avoided removing the bumper and grille Compared to a $150+ replacement plus labor, the savings are significant. Durability 1 year+ under direct Cali sunlight (currently on year 2 and still good) First Car – Learning the Process The first time I used the kit, my results were decent but not perfect. That was mainly because I didn’t fully understand how sanding and polishing actually work. ( this reoxidized fastest under 8 months, but it was mostly my fault) I didn’t initially realize: The headlight needs to stay wet during sanding Oxidation must be completely removed before applying clear coat Even pressure matters/ 50% overlap coverage when appling ceramic Once I understood that sanding is the most important step, everything improved. Second Car (beater) Major Improvement The second vehicle was heavily oxidized and yellowed. I used the remaining material from that same $17 kit and restored it completely. The clarity difference was dramatic. It looked close to factory condition, and night visibility noticeably improved. That was when I realized the product itself is solid; the key is proper technique. Third Car ; Recent purchase By the third car, the process felt straightforward. I followed the instructions carefully, kept the surface wet while sanding, and applied the clear coat evenly in one smooth pass. The final result was clear, glossy, and uniform. No haze, no streaking. Durability On my first vehicle, the restoration lasted close to a year perfectly( I sold that car this year and it still had clear headlights), and that car was parked outside in direct sun most days. For a DIY kit at this price point, that level of durability is impressive. Final Thoughts I seriously considered spending $150 on replacement headlights( this was cheapest ) and dealing with removing body panels. Instead, I spent $17 and restored two cars. Now having used it on three vehicles, I can say this kit is effective, cost-efficient, and worth the time if you follow the process properly. It does require effort and patience, but the results justify it. I would purchase it again.
WAS THIS REVIEW HELPFUL?YesReportShare
Reviewed in the United States on February 18, 2026
Y
Verified Purchase
YetAnotherITGuy
Alexandria, US
★★★★★ 5
works as advertised!
Size: 1 Count (Pack of 1)
I purchased this kit to renew the headlights on my 2016 Nissan Frontier pick-up. The headlights had become slightly oxidized and dull -- not that bad but it was bothering me and for the price of the kit I figured it was worth the effort to attempt to renew them. All I can say is -- WOW, what a difference. The end result looked like new -- clean, brilliant and bright. Read the directions (2 or 3 times) and follow them EXACTLY. Total time for me from opening the kit to being done was about 2 hours and I was taking my time. This kit is different in that the final step applies a UV resistant coating which really makes the glass super transparent. Great investment in the time and money. I can't stop admiring my new (old) headlights!
WAS THIS REVIEW HELPFUL?YesReportShare
Reviewed in the United States on May 14, 2026
A
Verified Purchase
Alex
Houston, US
★★★★★ 5
Incredible Results! The "Z-Line" is Back!
Size: 1 Count (Pack of 1), Size: 1 Count (Pack of 1)
I’ve tried a few "wipe-on" fixes in the past, but the CERAKOTE® Ceramic Headlight Restoration Kit is in a completely different league. If you are tired of hazy, yellowed lenses and weak nighttime visibility, look no further. 📖 Instructions & Ease of Use The first thing that stood out was the clarity of the instructions. The kit breaks everything down into a simple, step-by-step process. Even if you aren't a "car person," the directions are foolproof. They don't just tell you what to do; they explain why each step matters, which gave me the confidence to get the job done right the first time. ✨ Restoration Effectiveness As you can see in my Before and After photos, the transformation is night and day. My headlights went from a dull, oxidized yellow to a factory-fresh, crystal-clear finish. It didn't just "clean" them—it completely rejuvenated the plastic. 🔦 The Real Test: Light Output & Beam Pattern The most impressive part isn't just how the car looks, but how it performs at night. I’ve included a photo of my car parked against a wall in the dark to show the comparison: Passenger Side (Restored): You can see a sharp, distinct cutoff line and the perfect "Z-line" pattern. The light is focused exactly where it needs to be on the road. Driver Side (Not Restored yet): The light is completely distorted. There is no cutoff, just a messy blob of light that scatters everywhere, likely blinding oncoming traffic while providing less actual visibility for me. Final Verdict This kit doesn't just make your car look better; it’s a genuine safety upgrade. Seeing that crisp Z-line back on the wall proves that the clarity is internal as well as external. Highly recommended!
WAS THIS REVIEW HELPFUL?YesReportShare
Reviewed in the United States on April 15, 2026

recommand products