SKU: 81687203868
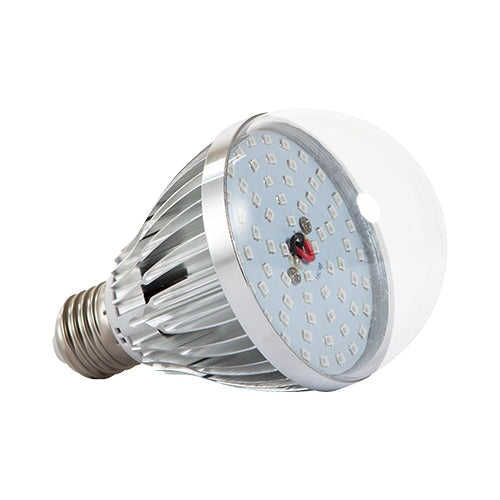
uv grow light bulb

uv grow light bulb DIY LED Screen Exposure Bulb

Sale price$19.54 Regular price$21.71
Save 10%

Pay in installments of $5.43 with ShopPay, AfterPay and Klarna

Shipping Estimate
USA
  • USA
  • CAN

Ships within 48 hours · Estimated delivery Jul 25 - Jul 30

Promo Codes Available:

For Your Every Summer RSVP, with Code: SUMMER15

Description

uv grow light bulb DIY LED Screen Exposure BulbBENEFITS: LED enhances the amount levels of possible details captured compared to UV bulbs. LED light sources expose screens quickly and creates a harder, more durable stencil for better on press longevity. LED bulbs consume less energy and last more than 10,000 hours, so you dont have to replace them as often. LED exposure is the new standard. It speeds up the process, produces stronger stencil development, and allows screen printers to capture more

BENEFITS:

  • LED enhances the amount/levels of possible details captured compared to UV bulbs.
  • LED light sources expose screens quickly and creates a harder, more durable stencil for better on-press longevity.
  • LED bulbs consume less energy and last more than 10,000 hours, so you don’t have to replace them as often.

LED exposure is the new standard. It speeds up the process, produces stronger stencil development, and allows screen printers to capture more details. The DIY LED Screen Exposure Bulb is a great way to expose a screen with a DIY screen printing setup. 

To use the bulb, simply screw in the bulb to any light fixture and safely expose a screen with the recommended Baselayr Long Lasting Emulsion for 10-11 minutes in a light safe environment. 

Replacing a UV bulb? It’s easy. Just screw in the new bulb and continue exposing screens as normal. You don’t need to change your darkroom process to get better results.

PRODUCT SPECS:

  • Electrical: 110v 9W 60 Hz
  • Mount: E27 Base
  • UV Wavelength: 395-405nm

HOW TO EXPOSE A SCREEN:

  • DIY bulb recommended for smaller size screens (16x20 or 20x24).
  • Source a light fixture to power the bulb. It’s best to use a fixture with a reflector on the back to direct the light as much as possible.
  • In a light safe environment, center the bulb directly above the middle of the screen at a height of 12-15 inches. The higher the bulb is, the longer the exposure time, and the more coverage it gives to the screen. The lower your bulb is, the shorter the exposure time, but the more direct the light source is to the center of the screen. For larger screens, use a higher distance and increase exposure time.
  • Place the film in reverse onto the shirt side of the screen and tape to screen. If the transparency is not opaque, the screen will not expose as well (i.e. loss of details captured on stencil). 
  • Add a piece of thin, optically clear glass on top of the film to increase the positive pressure during exposure. This is optional but strongly recommended, as it will increase the detail gained during exposure.
  • Expose for 10-11 minutes in a light safe environment. Ensure the screen is bone dry before exposing. Dry and expose screens in a room under 40% humidity. The more emulsion the screen has, the longer it will take to expose. Increase exposure times for lower mesh counts.
  • Rinse out your screen in a light safe environment

EXPOSURE TIPS:

If the image does not expose or wash out properly, try making the following adjustments:

  1. First, make sure the space you are in is light safe. Block out light from windows, under doors, etc. and use light safe bulbs.
  2. Apply a thin coat of emulsion to the screen and allow it to dry so it is smooth to the touch. If the emulsion is tacky, coat it with less emulsion or dry it for a longer period of time. Use a clean fan or dehumidifier to speed up the drying process.
  3. The film must be dark. For more information about getting a darker film positive, check out this blog
  4. The screen should have strong, positive contact between the film and the screen mesh. Add a sheet of glass and/or foam under the screen to increase positive contact.
  5. If the screen exposes but is slimy, increase exposure time by 1-2 minutes and try again.
Shipping Notes
  • Free Standard Shipping on $100+ Orders to the USA.
  • Except Preorder products are shipped in 48 hours.
  • Delivery to the USA:
  1. Standard Shipping : 3-10 business days
  • If time is of the essence, please consider selecting expedited delivery for faster service.
Exchange/Return Notes
  • We offer a 30-day return/exchange service after receiving.
  • Final sale items are not eligible for returns or exchanges.
  • To process your return/exchange, please contact us at [email protected]
  • Please click here for more details>>> Return & Exchange Policy
SKU: 81687203868

Discover Niche Categories That Outsell uv grow light bulb

Top-Converting Item to Boost Your Average Order

4.3 ★★★★★
Based on 30 reviews
Sort
Highest Rating
Newest First
Oldest First
Product Reviews
R
Verified Purchase
robert ferrell
Dallas, US
★★★★★ 5
Good
Color: Black, Size: 6 Panel
Love it , just what so needed , easy to put together (some what ) …
WAS THIS REVIEW HELPFUL?YesReportShare
Reviewed in the United States on May 16, 2026
C
Verified Purchase
Crimm
Natrona Heights, US
★★★★★ 3
Decent for the price. Instructions suck but most people should be able to figure it out. More below.
Color: Black, Size: 6 Panel, Color: Black, Size: 6 Panel
SUMMARY: 3 stars from me because it's firmly average. It's fine for the price. Assembly and materials are alright but I can see some caveats depending on your circumstances. Assembly instructions do a subpar job of pointing out some details. ASSEMBLY INSTRUCTIONS: Maybe it's because I'm autistic and/or building model kits and assembling stuff is my jam, but I honestly thought people were exaggerating when they were complaining about the instructions and I'd be able to flex my ~superior assembly skills.~ I was wrong! These instructions genuinely suck, and whoever is responsible for making them should be ashamed. The instructions do a poor job of calling out some details regarding orientation of parts, and some of the images do not actually match the physical parts. For example, it does not really outline the assembly of the end panels clearly, and I can see someone accidentally using the wrong poles. I've drawn over a photo to show what you should do to try and make it clearer. Additionally, the manual shows a flathead screw for bolting the feet into position, but the actual screw is not a flathead. It also does not point out the counterbore, so if you aren't paying attention you may put the foot pads onto the wrong side of the foot. It's also missing the fact that you need to use another one of the plastic pieces when you finish assembling a panel. ACTUAL ASSEMBLY & MATERIALS: To their credit, all of my bags were clearly labeled. The assembly process wasn't difficult. It's mostly just tedious and requires a fair amount of space. I was able to assemble it by myself without any real difficulty. However, the way it's assembled means two things. One, the fabric parts aren't removable without disassembly. So if you want to use this in an environment where they would require cleaning, I would seriously recommend looking for another option. Or, you could buy this just to use the frame pieces and then somehow buy or make your own fabric pieces designed to be removable with velcro or something. Two, because of the materials I really don't have a lot of faith in this thing surviving disassembly and reassembly. Like a lot of sorta-cheap-but-convenient furniture, it uses those spring-button connections and plastic inserts with self-tapping screws. Those things are not really meant to be disassembled and rethreaded. It also relies a lot on the tension of the poles and the fabric to keep everything rigid and squared, which I think puts a lot of pressure on the aforementioned buttons, plastic inserts, and the hollow metal rods. So I feel like that will also cause issues with disassembly and reassembly. Basically once this thing is assembled, it's not really meant to be disassembled. The best you can do is spot-clean the fabric if you need to. Speaking of the fabric, I didn't see any labels on them or anything in the manual that says what they are, but they feel like some kind of polyester. They generate static electricity pretty easily, and pet hair and debris sticks easily. So that's another downside of them not being easily removable. For the most part it does seem pretty stable. The poles seem to be pretty uniform in length so they're all making contact with my floor. Obviously this isn't structural so it shouldn't be supporting anything, but the two main feet seem to be doing fine with keeping this thing upright. CLOSING THOUGHTS: Really, it's fine for what it is, but it could be better in a lot of little ways and the substandard quality of the instructions just seems unprofessional to me, which is why I'm being so harsh with my rating. Depending on your needs and environment you may want to consider a different option. Preferably one that is made to be disassembled with better materials, and/or one with fabric pieces made to be removed easily.
WAS THIS REVIEW HELPFUL?YesReportShare
Reviewed in the United States on May 28, 2023
B
Verified Purchase
Barb
Dallas, US
★★★★★ 1
Not as it seems
Color: Black, Size: 6 Panel
these are awful... Each individual panel is fine, but when you put it together it can barely stand up, and the clips that hold it together keep popping off. Steer clear of this item.
WAS THIS REVIEW HELPFUL?YesReportShare
Reviewed in the United States on April 7, 2026
T
Verified Purchase
Timothy Beckner
Grantham, US
★★★★★ 5
As described
Color: White, Size: 6 Panel
Works great in my clinic
WAS THIS REVIEW HELPFUL?YesReportShare
Reviewed in the United States on May 17, 2026
E
Verified Purchase
884EVER
Lake Worth, US
★★★★★ 5
Great privacy screen
Size: 4 Panel-88"W, Color: Grey
Nice item, easy to assemble.
WAS THIS REVIEW HELPFUL?YesReportShare
Reviewed in the United States on January 15, 2026

recommand products